The 4 ways to run your unit tests in CI with Dockerfiles
Performance, convenience, and portability. Which will you choose?
Running your unit tests as early and as often as you can in your development cycle can help for rapidly building software, and doing it fearlessly and confidently. But with the abundance and wide adoption of containerization, how does this change the way that you do your continuous integration? One of the largest benefits about Dockerfiles is that they can be completely self contained. Your CI vendor of choice starts to matter less and less because the Dockerfiles themselves are portable and predictable. Almost every CI vendor these days can build a Dockerfile if you just point to one. Do you still need to run your tests on your CI provider directly? In this post, we’re going to go over the 4 different ways that you can run your unit tests when you have a Dockerfile. We’ll go over some of the pros and cons of each method.
Method #1: Don’t. Run your tests directly in CI hosts
This might be everyone’s default approach. Organizations that are still new to using containers in general might only be interested in doing so for your final deployment. In this pattern, you do things like run your tests and build your release artifacts in a separate environment, and then copy them directly into your Dockerfile.
Pros:
Arguably the most straightforward
Plenty of examples and documentation for how to do this since it’s the default for a lot of people
Easiest to adopt in transition to Dockerfiles
Cons:
Not portable. Coupled directly to CI provider
Need to maintain your CI environment on top of other environments
There is plenty of documentation for how to do this. Installing things like Python in your CI environment is going to be heavily supported and widely adopted. This method is easy to get started with. However, some of the cons are incredibly inconvenient. Relying on your CI vendor means that you’ll probably end up integrating with a lot of their proprietary functionality which means vendor lock in. Solving that problem is what systems like https://dagger.io and https://earthly.dev are trying to do. Additionally, you’ll notice that this workflow requires you to install python in your CI environment. You also have to have python installed in your deployed environments. This means you have a bifurcation in how you manage and administer your CI environment and how you manage and administer your live environments.
In this example, you’re only installing Python, but in real environments with useful applications, you need to install more complicated dependencies. In the Python community, it’s very normal for libraries to rely on or expect operating system level dependencies to be installed. In languages like Go, you can have all dependencies be statically linked, but in Python, if you want to communicate with a Postgres database, almost all of the popular libraries expect you to have an operating system dependency like libpq-dev to be installed. Now you need to install libpq in your CI environment and your live environment. And this problem balloons. If you want to be truly confident, you need to coordinate that when you update your CI environment, that you also update your live environment at the same time. If you don’t, you risk that you’re actually running your tests with different versions of dependencies than your live environment, which means you might get different behaviors in each environment.
Method #2: Run your tests on a pre-built CI image
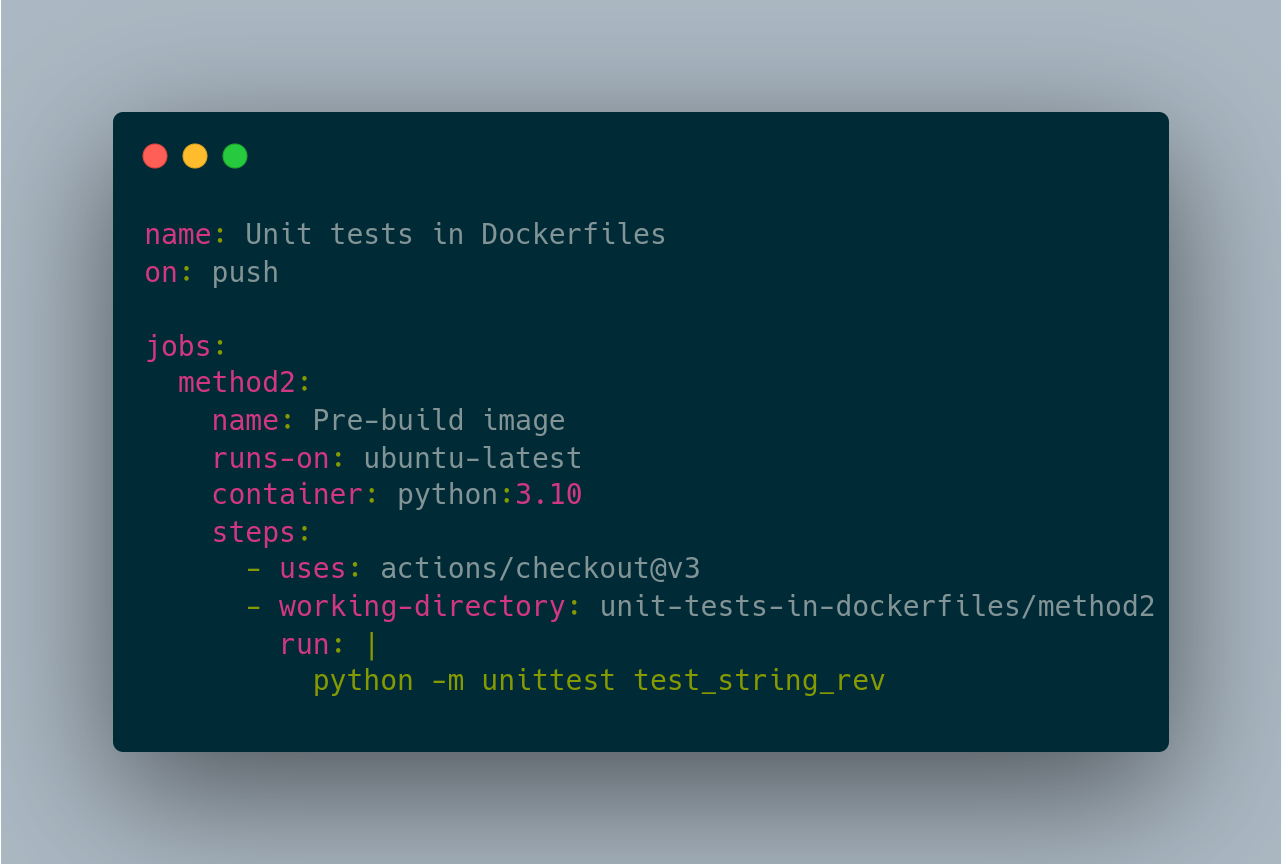
Many CI services will let you specify the container to actually execute your CI steps in. In GitHub Actions, this is the container key. In my example, I’m just using the official python image, but you could separately build a CI image that has all of your prerequisites.
Pros:
Decreasingly less coupled to your CI provider, relative to method 1
Cons:
Requires a separate CI process for the base image that you want to use
In method 1, we had to install system dependencies to the host runners for the CI provider. In method 2, we extract just that step into its own dedicated Dockerfile and then we rely on the CI provider to be able to let us override the runtime environment that executes your steps. In the GitHub Actions ecosystem, it’s normal to have actions that install certain tools, but most tools are unlikely to document how to install the tool itself into a GitHub Actions pipeline. But if you install the tools in your Dockerfile, you can likely just have a RUN command with their suggested install command.
On the downsides, this might be a little complicated still. Most of these CI providers will not let you define the override container to be an image that was built and loaded during the pipeline. That means that the image needs to be already built, and the CI environment needs to have the credentials to pull the image. This is a fairly straight forward one time setup but it can still be rather annoying to do the first time.
Method #3: Run your tests in your docker build
What about a more portable way to build your images? If you run the test command directly in your Dockerfile, then all you need to do to test your code is to build your Dockerfile, and the CI provider that you use doesn’t really matter.
Pros:
Extremely portable. Every CI provider has the ability to build a Docker image these days
Running your tests can be completely self contained
By definition, a successfully built Docker container is a container that passed all of its tests
Cons:
Building your Docker image can take a lot longer
Your final Docker image will have all of your test dependencies installed even if you don’t need them to run your application. Bigger images means longer pushes and pulls
Accessing secrets can be hard
I really enjoy this method for how self contained it is, and the guarantees it creates. If you run your tests in the container image itself, then your ability to move between CI vendors gets easier and easier if you need to, but more importantly, everything is self contained. Your Dockerfile can have all of your operating system level dependencies needed to run your tests, which means that you don’t have to install anything at all on the CI’s host machine. One of my absolute favorite parts about this is the unison of your build environment and your run environment. You know that anything you needed for the tests to run will be available for your application execution. This is really handy for interpreted programming languages. Lastly, every single image that gets built and pushed this way is required to pass your tests. If a test fails, the image build won’t succeed and there’s nothing to push. It’s nice knowing that every single image you have has passed your unit test suite.
On the downside, it can be really inconvenient to build your tests every single time. Remote and containerized development environments are becoming increasingly popular due to how complex our service architectures are becoming. You might be working on multiple services or need your development environments to have massive clusters of compute if you’re a data scientist, so you need a remote enviornment. There are several tools and companies that are trying to enable this workflow like https://skaffold.dev, https://tilt.dev, or paid services like https://okteto.com. These tools will sync your code to remote environments and re-build, re-push, and trigger a re-pull of your containers in a watch mode and reload them in your remote environment. If your organization is advanced enough to have a setup like this, firstly, congratulations. Second, running your tests every time might be a huge pain if your language ecosystem doesn’t have a good way of doing incremental or changed files based test executions. Since you’ve installed all of your test dependencies, the surface area and size of your application runtime container is going to have a lot of extra cruft. For example, in the Python ecosystem, it’s very normal to have tools like psf/black or PyCQA/pylint to be part of your CI steps. But once those are installed, you don’t need them to run your code, but since the exist in the Docker image, they’ll be part of each push and pull of the image. Even worse, sometimes these tools need their own operating system level dependencies that are just going to be laying around and be unused. Lastly, sometimes your CI environments need to access other systems. Passing in secrets or other configuration in general can be really annoying to have to explicitly do every time there’s a new secret or new config file.
Method #4: Run your tests in a multi-stage docker build
Use a Docker multi-stage build for getting rid of the cruft from method #3. Keep separate stages for just your CI, independent of your final image, but keep them in a single Dockerfile for the usability.
Pros:
Still portable overall
Smaller image sizes at the end of the day, keep only what you need
Stages can be built in parallel
Cons:
More config back on the CI provider
More complex. Large multi-stage Dockerfiles can be hard to understand
More redundancy in the Dockerfile itself
CI commands themselves are not codified in the Dockerfile
Need to keep better track of which dependencies are dev only vs runtime
I’ve worked on a number of Python and Nodejs based applications that have benefited from an approach like this. You get all of the portability of having your build be self contained, but with a twist. Docker builds have a —target flag which lets you specify to only build up and through a certain stage. In our case, what we do is we isolate all of the dependencies needed for CI in one stage, and then in CI we build to that stage, then run all of our test commands, and then we can build the rest of the image with our normal —target.
Approaches like this try to take a middle ground on the pros and cons we’ve seen up to this point. In a remote development environment, you can do your remote development with an earlier target and without running any of the test commands.
Unfortunately, depending on the programming language you’re using, there might be a lot of redundancy. A lot of package managers will let you specify if you want to install just dev dependencies or prod dependencies. For running your tests, you usually have to install them all, and then in a different stage you have to run the same command but without the dev dependencies. It’s not super common that package managers have a command for uninstalling just the dev dependencies. Another con to this approach is that for things like operating system dependencies, it can be really hard to know what you need for CI steps and what you need for runtime. In package managers like a package.json, there are separate sections for dev dependencies, but this doesn’t always translate easily to the fact that tools like nodejs/node-gyp need Python to be installed to execute, but once artifacts are built, you no longer need to have Python or node-gyp installed at all.
Conclusion
In this post we went over a few different ideas for how you can leverage Docker for doing your CI, on top of having your applications running in a container. In an upcoming newsletter post, I’m going to go over how I made method #3 outrageously fast on my Golang docker builds.
All code samples can also be seen on GitHub by viewing this repo.


